
In Oct 2015, I climbed to Annapurna Base Camp (4,130m). Alone. No guides or porters. If you ask me why, I don’t have an answer. I am not an experienced hiker or the fittest person around. I didn’t even intend to trek alone in the beginning but when my friend cancelled, I thought “why not?”. On the surface, I wanted to undertake the trek solo as an experiment. I had backpacked alone before in Europe, so I wasn’t new to solo trips. But this was different. This was no Europe. There were anti-India protests around the time. I had never undertaken multi-day trek and lived in plains. So I considered this as an adventure.
But deep inside, it was something more. It was about pushing yourself. When you take out the choice of returning back, when the only option is to keep going, when you are stripped down to bare essentials, what do you do? On a solo journey, I found time to think. Have perspectives. Introspect. Get closer to answering who I am. The day to day issues I keep facing at work or in personal life dwarfed in front of the mighty mountains. I learnt a great deal about myself through this journey and I am sure the experience is very different and personal and enriching to different people.
But most importantly, I was happy.
I felt alive when I was climbing. I am in the moment despite the short breaths, crushed bones and apparently pointless destinations. There is nothing else in my thoughts except the might of the mountain I am climbing and the stunning scenic views around me. It’s cathartic.
I completed the trek in 8 days (there are itineraries up to 14 days). While I undertook the trek to mark a personal achievement, I was blown away by my experiences through the journey. In the end, the memories of the journey lingered and I barely remember how I felt when I reached the base camp. While the view of the base camp was spellbinding, the entire trail was picturesque giving the trekkers a whole range of views from lush green mountains in the early part of the trek to deep but friendly forests to mighty snowy mountain ranges in the later part. The friendliness of the hard working and beautiful people of Nepal made my journey fulfilling and memorable. This last factor is the reason I will visit Nepal again, as many times as I can.
However, not all was hunky-dory. This trek turned out to be more of a test of mental strength than physical. There were times when I was alone in the middle of a forest, in pouring rain, having lost my sleeping bag, completely drenched, repeatedly getting lost, not sure when the trail ends or when I can see a lodge or even people and wanting to give up. To just lie down somewhere and sleep. Hoping to be back in my bed. And there was no place to sit. Or the time one of my knees started hurting. And staying put for a day or two longer was not an option as I had to leave for another country on work. Or the time I couldn’t get a transport back to the airport because of the fuel crisis. And I didn’t know what to do or where to stay. Or that moment when I slipped at the edge of a mountain and looking back to see there was no one around. To get a grim reminder that should something happen, I need to wait and hope for help to arrive. Yes, there were times when I felt completely stupid for doing this alone. And I just wanted to hug someone.
Yet, this is why the journey felt fulfilling. It was challenging and it felt like an accomplishment to complete it. It was not about the climb. It was about learning what I would do when the option to go back was taken off. If I fell, I got up. If I got lost, I found my way back. If my knee hurt, I dragged myself through the mountains to reach my destination for the evening. It was learning about the incredible human resilience. It was about strangers helping me out. And that it’s ok to get help. I came out of the journey a changed person.
I encourage you to go for this trek. It’s not physically demanding (I am no athlete) and yet you are treated to stunning views and unforgettable experience. In the rest of this article, I have laid out the different elements of the trip you need to know about the journey in the hope to help you prepare well for this trip.
Duration:
I completed the trek in 8 days but several trekkers had 9 day/ 10 day/ 12 day itineraries as well. The journey is a series of uphills and downhills; so you won’t be too tired.
Best times:
October to November has good weather and is not too cold. March to May is another good season. These are peak seasons and expect more people during these times.
Budget:
This will be one of the cheaper treks in the world for the views you get. If you are trekking without a guide or porter, expect to spend around 1000-2500 NPR per person per day on stay and food (cost increases with altitude). In addition, budget for trek permits (TIMS, ACAP), flights and transport to and from trek starting point. A guide will cost additional 2000-4000 NPR per day (if it’s a group, the cost will be a little higher but will still be cheaper per person). Porter will be an additional cost and typically each carries up to 15 kg. So you need to budget for porters according to your luggage weight. Pre- booked guided tours will be more expensive than finding guides/ porters on the ground but if you are not comfortable with your negotiation skills, don’t take the risk and go for a pre-booked guided tour.
Also, carry cash. Credit cards are usually not accepted. Besides Nepali currency, Indian currency is accepted (but typically in less than INR 100 denominations). If you are part of a guided tour, you probably have paid in advance and need not carry much cash.
Accommodation and facilities:
Nepal has one of the best facilities and comforts for high altitude treks. The local community has developed a scenic trail to make it comfortable for even amateur hikers. There are ‘villages’ at 2-3 hr intervals for overnight stays. These ‘villages’ have “tea houses”, each of which has guest rooms, restaurant and shared bathrooms. The toilets are squat style. The tea houses are generally clean and also have wifi, common charging points and hot showers. The shared rest rooms and restaurants are open to all travelers.
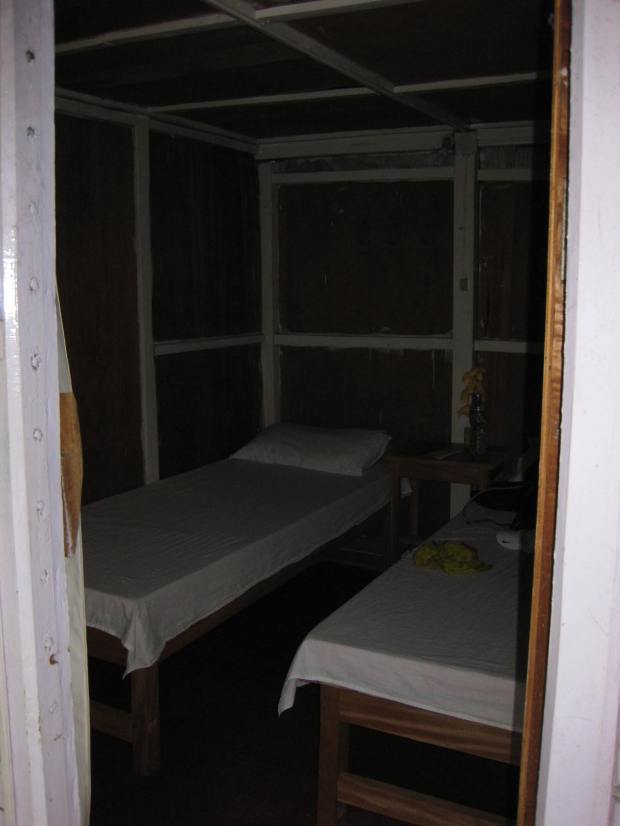
A typical room in a tea house
The economics of the tea houses are interesting. While the room rent (single/ double bedded) costs just 200-300 NPR, you are expected to use all other facilities from that tea house itself including food, wifi etc. They have a “pay per service” model with food and water costing ~400-600 NPR per person, wifi costing 150-200 NPR, hot shower 100-200, phone charging 100-150/ hr. Overall I found this pricing model interesting (against a bundled pricing) allowing people with different affordability level to set their daily expense. I used all the facilities at all the places I stayed and had an expense of ~1500-2500 NPR per day depending on the altitude.
Overall, I had brilliant experience with the tea houses. Typically, most of the guests arrive by 3 pm on any day. There is a common dining hall for each tea house which serves as a socializing area and is a great chance to meet to fellow trekkers. I met people with so many nationalities that I lost count. The age range was equally diverse with trekkers from early 20s to late 60s.

Dining Hall starting to fill up at the base camp
The menu was equally diverse which included the traditional dal bhat (rice with lentil curry and veggies/ meat on the side), a selection of pizzas, pastas and breads. A variety of tea and coffee dominate the beverage sections. I had a yummy pizza at an altitude of ~3000m and a TIME featured chocolate cake at 2500m.

The traditional dal bhat

It took less than 10 min to finish this pizza
The availability of wifi and hot showers up to an altitude of 3200m was even more surprising. At higher altitudes, the hot showers were powered by gas. I had prepared my friends and parents to not expect much communication from me during the 4-5 days at higher altitudes (they were naturally concerned with me traveling alone and wanted me to regularly inform them of my whereabouts). However, I was able to stay in touch on all the days (except at the base camp).
I could not find a way to book in advance (travel agencies with large groups were able to). As the availability of rooms is limited at higher altitudes, trekkers who don’t have advanced booking are likely to get shared rooms and in some cases, no rooms at all. They may have to walk to the next village. However, the community is very accommodating and if the trekkers are unable to move forward or are at the base camp, they can sleep in the common dining area. It’s advisable to carry a sleeping bag for this reason although I didn’t have to use one.
Route and 8-day itinerary:

Annapurna Base Camp Trekking Map
The nearest airport is Pokhara where you can get the trek permits and other trek gear. Nayapul is the usual starting point of the trek (~1 hr away from Pokhara by Car/ Jeep). Some people start from Phedi as well. Trekkers follow 2 routes to reach the base camp: via Ghorepani to Chhomrong to Base Camp (longer route but more gradual climb) or via Landruk to Chhomrong to Base Camp (shorter but steeper climb). Similarly, either route can be used for coming back from the base camp. I used the route via Ghorepani for trekking to the base camp and came back via Jhinudanda – Syauli Bazar – Nayapul. My itinerary was as follows:
Day 1 Drive to Nayapul to Climb to Tikhedunga (4-5 hrs): Reached Pokhara from Kathmandu through air. Got permits from Pokhara and drove to Nayapul (~1 hr). Started the trek at Nayapul and climbed to Tikhedunga. This was mostly flat and had very gradual ascent. Overnight stay at Tikhedunga.

View from my room at Tikhedunga
Day 2 Climb to Ghorepani (6-8 hrs/ 2,750m): The climb to Ulleri and then to Ghorepani was steep and through stone stairs which was a great way to tone your legs (if not kill them). The last leg of today’s trek was through a beautiful forest. Ghorepani is the mountain pass overlooking the deep Kali Gandaki valley wedged between two 8000m+ peaks of Dhaulagiri and Annapurna.
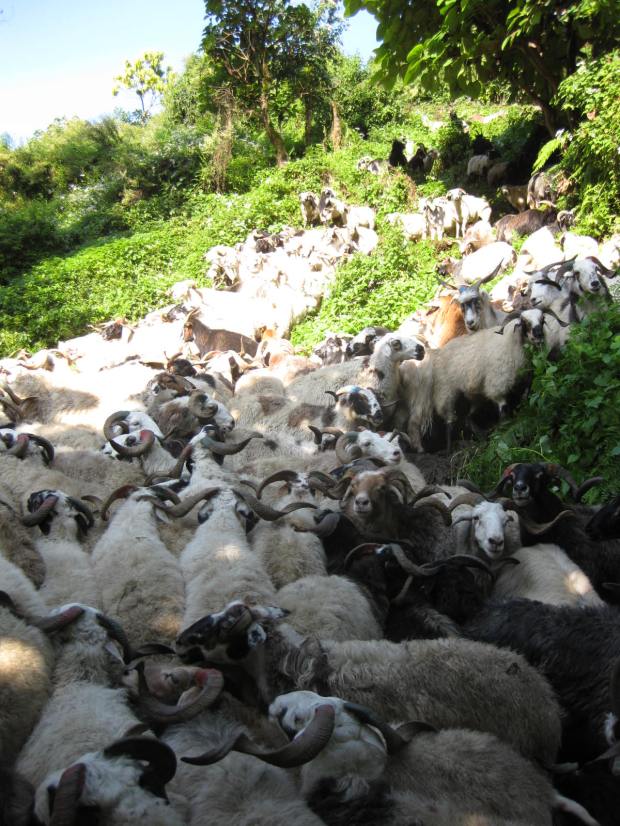
These lovely mountain goats created the welcome ‘traffic jams’. They are being taken to the city for the “Durga Puja” festival.
Day 3 Trek to Poon Hill (1 hr/ 3,193m) and Climb to Tadapani (5 hr/ 2,590m) : Poon Hill is a shorter, 5 day trek in the Annapurna sanctuary that most of the trekkers undertake if they don’t have the time to go all the way up to the base camp. From Ghorepani, I climbed to Poon Hill (~1 hr) before sunrise to catch the sunrise view of 15 peaks. These include Dhaulagiri (8,167m/ 7th highest), Annapurna I (8,091m/ 10th highest) and Manaslu (8,156m/ 8th highest). Some say this is the most beautiful view of Annapurna sanctuary and is also the only place with a view of so many 8000m+ peaks at the same time.

The first sighting of Annapurna I from Poon Hill

Part of the view from Poon Hill. Dhaulagiri peak starts glowing in gold with the sunrise.
I climbed down to Ghorepani and after breakfast started my trek to Tadapani. This trek was through the lovely rhododendron forest and there were some amazing views of green mountains on the way.

Trekking through the rhododendron forest
Overnight stay at Tadapani. Here we were treated to a closer view of Annapurna I and Machapucchre (Fish Tail) peaks at sunrise. This was another surreal view. Apparently, no one has been able to scale Machapucchre and the government eventually banned summitting it.
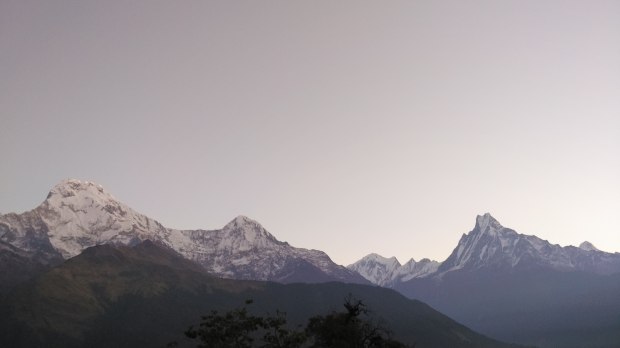
Annapurna I (left) and Machapucchre (right) from Tadapani

The surreal view of sunrise beyond the mountains and clouds at Tadapani
Day 4 Climb to Sinwa (8 hrs/ ): The trek today took me through Chhomrong which was one of the larger villages in the trek. Chhomrong also has great view of Annapurna and Machapuchhre but I decided to climb up to Sinwa to stay ahead. From here on, I was afraid of not finding a room if I didn’t reach early. However, my fears were unfounded. Overnight stay at Sinwa.

My room at the edge of the mountain overlooking Machapucchre peak
Day 5 Climb to Duerali (7-8 hrs/ 3,100m): By now, I had started to gain speed and was typically faster than the average estimated times. However, some people may start to feel mountain sickness at this altitude and it is advisable to climb slow and drink lots of water. I was drinking 4-5 ltrs per day.

Early morning view at Duerali
Day 6 Climb to Annapurna Base Camp (3-4 hrs/ 4,130m): Today was the big day. I started by around 7 am and reached the base camp by 10 30 am while taking in all the beauty around me on the way. I crossed Machapucchre base camp on the way and was treated to a surreal sunrise behind the Machapucchre peak appearing like a halo.

The sun rising behind Machapucchre as a halo
The last stretch of the climb was almost flat but had the best view in my personal opinion. The contrasting colors of blue sky, white mountain peaks of Annapurna range and brownish grass is a view that’s frozen in my memory for eternity.

Blue, white and brown. The last dash to the base camp.

Finally the Annapurna Base Camp

Mission Accomplished

The golden glow of Annapurna at sunrise

Surrounded by some of the tallest mountains
Tip: Try to reach the base camp before 11 am so that you can get the spectacular views in day time as well (the next day, people usually start from the base camp by 7-8 am after sunrise view). The place gets completely overcast by clouds by 11 am reducing visibility to just a few meters.
Day 7 Descent to Sinwa (8 hrs): Even though the trek was a series of ascents and descents, by now I was used to trekking for up to 8 hrs a day and found the descent relatively easier. I initially planned to climb down to Ghorepani but stopped at Sinwa as I was hurting on my right knee due to a slip earlier.
Day 8 Descent to Nayapul via Jhinudanda (8 hrs): Jhinudanda has hot water springs and is a usual stop for many trekkers. However, as I didn’t have enough time and due to fuel uncertainty, I decided to finish the trek by today. After asking around, I found out that there may be a bus from Syauli Bazar. However, due to fuel shortage, the transport had become erratic with just one bus trip per day. The bus had left early in the morning and the driver had no plans of making another trip that day. The shared jeeps which were a cheaper option also started charging high. I kept walking and near Nayapul I fortunately found a jeep heading to Pokhara (a guide reccommended hailing any vehicle traveling to Pokhara and that they will be happy to help me; this is how the people of Nepal were working together in crisis). The driver charged me 1000 NPR (the normal charges are 200-300 but the fuel shortage had increased the cost of transportation).
My trek ended today and I reached Pokhara after a roller-coaster jeep ride.
Logistics:
Currently, Nepal is under fuel crisis that has hit tourism and transportation industries. The closest airport for Annapurna Sanctuary is Pokhara which is ~30 min by flight from Kathmandu. There are flights every 30 min to 1 hr from 8 30 am with the last flight at 3 30 pm. While going to Pokhara, choose a seat on the right to get the aerial view of Himalayan range. Choose the left seat on return. The flight costs ~5000 NPR for Nepalis and Indians while almost twice as much for other nationalities. The flights have to be booked through agents who get about 20-25% as commission.
Both Kathmandu and Pokhara have permit offices. You can get the permits yourselves and will need 4 passport size photographs. For Annapurna Base camp, you will need to get 2 permits- TIMS and ACAP. It took ~30 min for me to get the permits.
In Kathmandu, I chose to stay near the airport (less than a km away). The easiest one to spot is the Airport Hotel which costs ~4000 NPR in peak season. The famous Pashupathinath temple is also nearby. Beware of cabs at the airport as they can charge hefty prices. While I didn’t use cabs in Kathmandu, I took the cab outside the airport premises in Pokhara. I am used to negotiating but even I found it hard to understand the fair price given the fuel crisis.
In Pokhara, Lakeside is the common tourist place with several hotels. It is about 5 km away from the airport. I got a decent hotel for ~2000 NPR per night. The day I landed in Pokhara, I got a cab who agreed to take me to the permit offices and then to Nayapul for 3000 NPR. For the fuel shortage it was a good price, but thrice the normal times. I had an interesting chat with the driver who told me about the fuel quota, black market rates and the ripple effects of the crisis in the economy.
The weather is an unpredictable factor and it is advisable to keep a flexible schedule. While Oct- Nov is the best time, some days can be overcast hindering any view. I was fortunate to reach the key view points (Poon Hill, Base Camp) on good weather days but be prepared to stay 1-2 days longer at a place as you don’t want to miss the views due to bad weather. Even on a good weather day, plan to reach your destination by 3 pm as it usually rains in the evenings. Also the surroundings are completely overcast by 1 pm. I had my fair share of drenched days. It is not thrilling and can scare or demotivate you as a solo traveler.
Things to carry:
Don’t come prepared as if you are going to summit Everest. Which means, you don’t need summit suits, snow gears or boots or oxygen cylinders. You are not going to a war zone, so don’t worry about carrying a ton of ration as well. As I was travelling solo, I was meticulous with the things I carried and restricted myself to bare minimum. If you are traveling for months and have large backpacks, you can leave them at Nayapul or Phedi. For guidance, following is what I carried:
- Light weight back-pack (30L)
- 2 pairs of trek pants (one dry fit and 1 woolen)
- 2 pairs of dry fit, long sleeved tops (learnt the hard way to protect my skin as much as possible)
- Thermal wear (these don’t take much volume but will keep you warm at the base camp)
- Inner wears and toiletries (you can easily purchase these at several places along the trek)
- Sun-screen (SPF 50+)
- Bandanna, Summer Cap, Woolen Cap
- Pair of socks
- Short sleeved top (for night wear and travel through city)
- Light weight, water proof jacket that can keep you warm at high altitude temperatures
- Water proof gloves
- Head lamp with batteries
- Phone, Camera, Chargers
- Sleeping bag (I didn’t use this)
- Hiking boots (normal ones will do, there was no snow in Oct)
- Bathroom slippers
- Energy bars/ snickers
- First aid (including Diamox for mountain sickness)
- Walking stick (my mistake was not buying this)
Conclusion
My trek was memorable because of all the help I got along the way- from a friendly agent I met outside the airport to a guide who let me accompany his group during climb in the dark to Poon Hill, from the porters I played badminton with to those who kept me company despite the weight they were carrying, and my fellow trekkers who shared their gear when I was suffering from knee pain. A solo trip can get depressing without the sense of community and friends around. And I felt cared for throughout the trek. I knew half of the base camp by the time I reached there. These bonds had the greatest impact on me.
In the end, my request to you is to support the local economy as much as possible. Don’t negotiate at the tea houses. This is one of the cheapest treks with fantastic facilities. The local community is very hardworking and is doing its best to make it comfortable despite the fuel crisis. Bon Voyage!
Feel free to share your experiences/ views if you have been to this trek before or drop me any questions you have in the comments section. I will try to respond to your queries as soon as possible.

very inspiring & memorable lil adventure of yours :)/
good to read.. keep writing n travelling \m/
LikeLike
Thanks Jyoti 🙂
LikeLike
Hi, thanks for sharing your experience 🙂
I’m planning on doing the trip in March next year (yes, I like planning a lot lol) and I’d prefer doing it on my own but at the same time am thinking about taking a guide. I’d rather not because I wanna be independent, for example stay an extra night somewhere if I want/need to.
Have you had any problems finding a place to stay? And how hard is it to find the way, do you get lost there easily?
Thanks 🙂
LikeLike
Hi Maribel. It’s definitely not tough to do it on your own. Also, it’s fairly easy to find a place to stay. At higher altitudes (3200m+), you may have to share rooms as solo travellers don’t get an entire room. If you reach by 1 pm, you will get a room. If not, they will accommodate you in the dining hall. Basically, you won’t be left to fend for yourself 😛
The route is fairly straightforward. There is just one path. At villages, where there are multiple paths, you can always ask someone the way to your next destination. I got lost probably one time but usually you find some hotel/ village every hour, so you can always correct your path 🙂
Good luck and let me know how it went!
LikeLike
thank you, that’s good to hear and sounds awesome. I’d like to start straight away 😀
LikeLike
Haha. Now is a bad time. Try October/ Nov. Also keep some flexibility in case the weather is bad for a couple of days during the trek.
LikeLike
Hi, I’m Mieza from Malaysia 🙂 I’m planning to trek ABC in December 2017 as my graduation gift (expected to grad my master’s degree in Nov’17) and there’s a high probability that I’ll be attempting it alone. Thank you so much for sharing your story, I’m bookmarking it as my reading + preparation list. Your story is inspiring and I cant wait for the day that i’ll get to document mine too ^_^
LikeLike
Thank you so much! And good luck with your graduation as well as the trek. Share the link with me when you get to document your story.
LikeLike
A Great Post!!!
LikeLiked by 2 people
Hi Sripriya, Your journey is inspiring. I am also thinking to go on a trek something like this. I have a question, how do you book your flight tickets from Kathmandu to Pokhara and return ? If the journey is flexible like extending for 1 or 2 days to get good views then how can we change the flight tickets ? Also for permits, shall we get both TIMS and ACAP at the same place ?
LikeLike
Usually the local flights can be rescheduled without extra cost. Book the tickets with enough buffer and if you finish the trek sooner, you can go to the airport and ask for each earlier flight. If it’s available, they usually accommodate you.
LikeLike
Yes, you get both the permits from the permit office in kathmandu.
LikeLike
Really you are a brave girl… We also had visited there in same time for poon hill trek. The stone case from Hille to Ghorepani are very steep and continuous.
LikeLike
Thank you!
LikeLike
hi, thanks for the detailed account. This is really great. I plan to do this, this march , solo and i am planning based on your blog. 🙂
LikeLike
All the best and have fun!
LikeLike
Hi, I have taken a print of your blog and am following it for my ABC trek starting on 5th Nov. Just a quick query – why were you carrying sleeping bag with you? Don’t the tea houses provide enough blankets for the night? Can I avoid carrying sleeping bag?Thanks in advance!!
LikeLike
You are going during low season so availability should not be an issue. You should be getting blankets. I didn’t use my sleeping bag for ABC at all. All the best!
LikeLike
That’s a really informative write up! I am just back from a trek in Sikkim and have started to plan the next one, and ABC is looking great. I have some quick queries though:
1. What is the procedure for Indians entering Nepal given that we don’t need visas ?
2. What is the combined cost of the TIMS and ACAP permits?
3. Would it be advisable to have a local guide who could possibly tell us of the local culture or lore during the trek?
LikeLike
1. You just need to go the passport control counter and get it stamped. It’s very similar to when you enter India from another country.
2. I forgot the combined cost but was around 3000 NPR I think (for Indians)
3. If you are interested in getting to know the local culture, definitely go for it! For many of them, this is their key income source.
LikeLike
Thanks much for the info!
I have one more query though. How did you manage cash during the trek? I am guessing an 8 day trek would require around 25 to 30k NPR. Can VISA credit/debit cards from Indian banks be used to withdraw cash from ATMs in Kathmandu and Pokhara?
LikeLike
Yes they can be used at ATMs in either place. But there are no ATMs beyond Pokhara. So carry all the cash you need for the entire trek. Many places also accept INR (Rs 100 denominations or lower).
LikeLike
Hi Sripriya, Your journey is inspiring and congrats on your accomplishment 🙂 I’m planning to travel ABC solo late December this year. If you could help me with some of the queries –
1. How is the trek to ABC during December and how difficult it is to find a place for solo traveler. Did you pre-book anything ?
2. Where can get the supplies for trek in Nepal? Any recommendation to purchase the items you mentioned in the blog.
3. Also, what documents are required for permit application ?
Thank you for the beautiful post!
LikeLike
Hi Akash,
1. The trek isn’t too difficult if you have a decent level of fitness. Mountain sickness can hit anyone, so take precaution on that- drink 3L of water every day and start slow. The difficulty will be primarily due to cold (December is a lean month). I didn’t pre-book anything and I went during peak season. December is a lean month and there should be no problem finding a place.
2. I bought a down-jacket and sleeping bag (sleeping bag is not necessary- all places have thick blankets) from Thamel, Kathmandu. Check out the store- Shona’s Alpine (it’s searchable in google maps). It is owned by an Australian origin person. Both him and his wife was knowledgeable and will not try to sell you anything you don’t need. The quality is also good. Further, I carried just one pair of dry fit trek pant and top (besides a woollen trek pant and top for the night). I bought these at Decathlon but you should be able to buy these at the store as well.
3. Just carry a few passport size photos. They didn’t ask for any documents other than an ID (passport in my case).
LikeLiked by 1 person
What a surreal depiction !
Thanks a ton for all the information and a beautiful write up.
–
LikeLike
Thank you!
LikeLike
A good reading. Nicely narrated and very informative. I am going for ABC in April,18 with a group of 10 people.
Thank you !
LikeLike
Hello, it’s really good to see a post like this with many of your experiences shared and also informative at the same time. I have some queries that I would like to ask you about the trek. I am planning a trek with a group of 7 people for March 2019. So,
1.Is it important to pre book the trek through any portal or can we travel just in our group.
2.also is there a bus route from kathmandu to poker and would it be fine to travel by bus.
3.How exactly do we trace our path while trekking to know whether we are on the right track.
4.And what amount would you suggest to be carried in cash excluding flight/bus ticket
LikeLike
Hi Sanskriti, here are the answers:
1- you don’t need to pre-book. I went on my own without any prior bookings. But be prepared for uncertainties. At higher altitudes, the rooms are in short supply, so try to reach earlier.
2- there is a bus from kathmandu to Pokhara. It should be fine to travel by bus but I would suggest taking 1-2 days rest at Pokhara before you start the trek because bus travel could be tiring.
3- Download a map or buy one from the trekking permit office. Once you start the trek, it’s mostly a single route. If you do get confused, ask around… there will be many people on the trek.
4- Back in 2015, it took appx Nepali Rupees 2000 per day per person. So plan according to that for 8-9 days + some buffer amount as back-up in case you run out of cash. At lower altitudes, they also accept Indian rupees.
LikeLike
Hey,
Firstly, thank you for this comprehensive post with all the beautiful pictures. I’m planning for a late December-Jan ABC trek and was wondering if you can help me with any info related to local travel agencies that organise the trek. Did you enquire for one and if yes, what was the quote they gave you?
Thank you 🙂
LikeLike
Hi Shiv, as I mentioned in the blog, I didn’t go through any agency. So I don’t have any opinion of their quality of services or quote. I can send you the contact of an agent I met at the airport who helped me with booking flight tickets to Pokhara.
LikeLike